How to Start a Cottage Food Business in 2026: Legal, Financial, and Kitchen Setup Steps for Home Bakers
When I baked my first paid order out of my home kitchen in Beachwood, NJ, I had no idea what I was doing on the business side. I knew my cakes were good. I had no idea whether I was allowed to sell them from my house, whether I needed a permit, or whether I was charging enough to actually make any money.
Nobody handed me a roadmap. I figured it out the hard way — through hours of Google searches, a few phone calls to my county health department, and a lot of expensive mistakes on the pricing side.
This guide is the roadmap I wish I’d had.
It covers the four things every home baker needs to get in place before — or right as — they start taking paid orders: the legal foundation, the financial setup, the physical kitchen and equipment systems, and the basic marketing presence. I’ve updated everything for 2026, and I’ve replaced all the generic business advice with specifics that actually apply to cottage food businesses and home bakeries.
Work through it in phases. You don’t have to do everything at once. But by the time you finish all four phases, you’ll have a real business — not just a hobby that occasionally makes money.
Your 30-Day Home Bakery Launch Checklist
Here’s a quick overview of the four phases. Each one is broken down in detail below.
- Phase 1 (Days 1–7): Legal foundation — cottage food laws, permits, business registration, labeling
- Phase 2 (Days 8–14): Financial setup — pricing, separate bank account, expense tracking, tax basics
- Phase 3 (Days 15–21): Kitchen and equipment setup — workspace organization, food safety, equipment inventory
- Phase 4 (Days 22–30): Marketing foundation — Instagram presence, custom cake page, order process
Let’s go through each one.
Phase 1: The Legal Foundation for Your Cottage Food Business (Days 1–7)

I know. Legal stuff is not why you got into baking. But this is the one area where skipping steps can actually cost you — not just fines or permit issues, but the stress of building something on a shaky foundation. Getting this right upfront takes less time than you think, and most of it comes down to understanding three things: what your state allows, what permits you need, and how to label your products correctly.
Step 1: Look Up Your State’s Cottage Food Laws
Cottage food laws are the state-level rules that determine what home bakers can legally produce and sell. They vary significantly from state to state. Some states are very permissive — they let you sell almost anything non-perishable, direct to consumers, with minimal registration. Others have strict sales caps, product restrictions, or require home kitchen inspections before you can take your first order.
Before you do anything else, you need to know what your state actually allows. Key questions to answer:
- What foods are permitted under cottage food law in your state? (Usually shelf-stable baked goods — cookies, cakes, breads — but not products that require refrigeration)
- Where can you legally sell? (Direct to consumer only? Farmers markets? Online with shipping?)
- Is there an annual gross sales cap you can’t exceed?
- Are home kitchen inspections required?
- Do you need to register with your county health department or state agriculture department?
We’ve done the research across all 50 states so you don’t have to start from scratch. Check the SweetTube Academy Complete Cottage Food Laws Directory for your state’s current rules, including 2026 updates.
Step 2: Obtain the Permits and Licenses Your State Requires
Depending on your state and county, you may need one or more of the following:
- Cottage food registration or permit — Many states require you to register with your local health department or county clerk. This is usually a simple form and a small fee (typically $25–$100). Some counties also conduct a brief home kitchen inspection to verify basic food safety compliance.
- Food handler’s permit or food safety certification — Some states require at least one person in the business to hold a food handler’s card or complete a food safety course. ServSafe is the most widely accepted certification. Even where it’s not required, it’s worth having — it protects you and your customers.
- Business license or DBA (“Doing Business As”) registration — If you’re selling under a business name (rather than your legal name), most counties require a DBA registration. This is also where you decide your business structure — sole proprietor is the simplest starting point for most home bakers.
- Home occupation permit — Some municipalities require this if you’re running any business out of your home. Check with your local zoning office.
Don’t be intimidated by this list. For most home bakers, the full legal setup involves registering with one office, paying a small fee, and completing one or two short forms. Call your county health department — in my experience, they’re usually genuinely helpful to home food businesses.
Step 3: Understand Home Kitchen Inspection Requirements
Some states and counties require a home kitchen inspection before you can legally sell. This is not as scary as it sounds. Inspectors are typically checking that you have:
- A clean, functional kitchen with working refrigeration and adequate handwashing facilities
- Proper food storage (ingredients stored off the floor, away from cleaning products)
- A pet-free cooking space during production (many states require this)
- No signs of pest activity
Even if your state doesn’t require an inspection, it’s a good idea to run through this mental checklist before your first order. These are food safety basics that protect your customers — and you.
Step 4: Set Up Proper Product Labeling
Most cottage food states require every product you sell to carry a label. Required information typically includes:
- Product name
- Your name and home address (or business address)
- Ingredients in descending order by weight
- Net weight or count
- Allergen disclosure — nuts, dairy, eggs, gluten, soy (check your state’s requirements)
- A cottage food disclosure statement (exact wording varies by state, but it typically reads something like: “Made in a home kitchen not inspected by [state agency].”)
You can create professional-looking labels affordably using Canva. Start with a simple design and make it match your brand. Consistent packaging makes a real impression on customers.
Phase 1 Checklist
- ☐ Researched my state’s cottage food laws (see the Cottage Food Laws Directory)
- ☐ Identified all required permits and licenses for my county
- ☐ Completed business registration or DBA (if applicable)
- ☐ Obtained food handler’s permit or food safety certification (if required)
- ☐ Scheduled or completed home kitchen inspection (if required)
- ☐ Created compliant product labels with all required information
Phase 2: Financial Setup for Your Home Bakery (Days 8–14)
The most common financial mistake I see home bakers make is undercharging — and I made it too. For the first year, I priced based on what “felt fair” or what I thought customers would pay. I had no idea whether I was actually making money after ingredient costs, my time, and overhead. Spoiler: I wasn’t, at least not on everything.
Getting your financial foundation right early saves you from having to raise prices dramatically later (which is awkward with existing customers) and from the slow burn of working hard without building anything financially meaningful.
Step 1: Open a Dedicated Business Checking Account
This is the single most important financial step you can take as a new home baker. Open a separate bank account for your baking business — one that only receives business income and only pays business expenses.
Why it matters:
- At tax time, you’ll have a clean record of all income and expenses without sorting through personal transactions
- It gives you a clearer picture of whether your business is actually profitable
- It’s required for certain business structures (and strongly recommended for all of them)
- It looks more professional if you’re accepting payments via Venmo Business, PayPal, or Square
You don’t need a fancy business account. Many online banks and credit unions offer free business checking. Just make sure it’s kept completely separate from your personal finances.
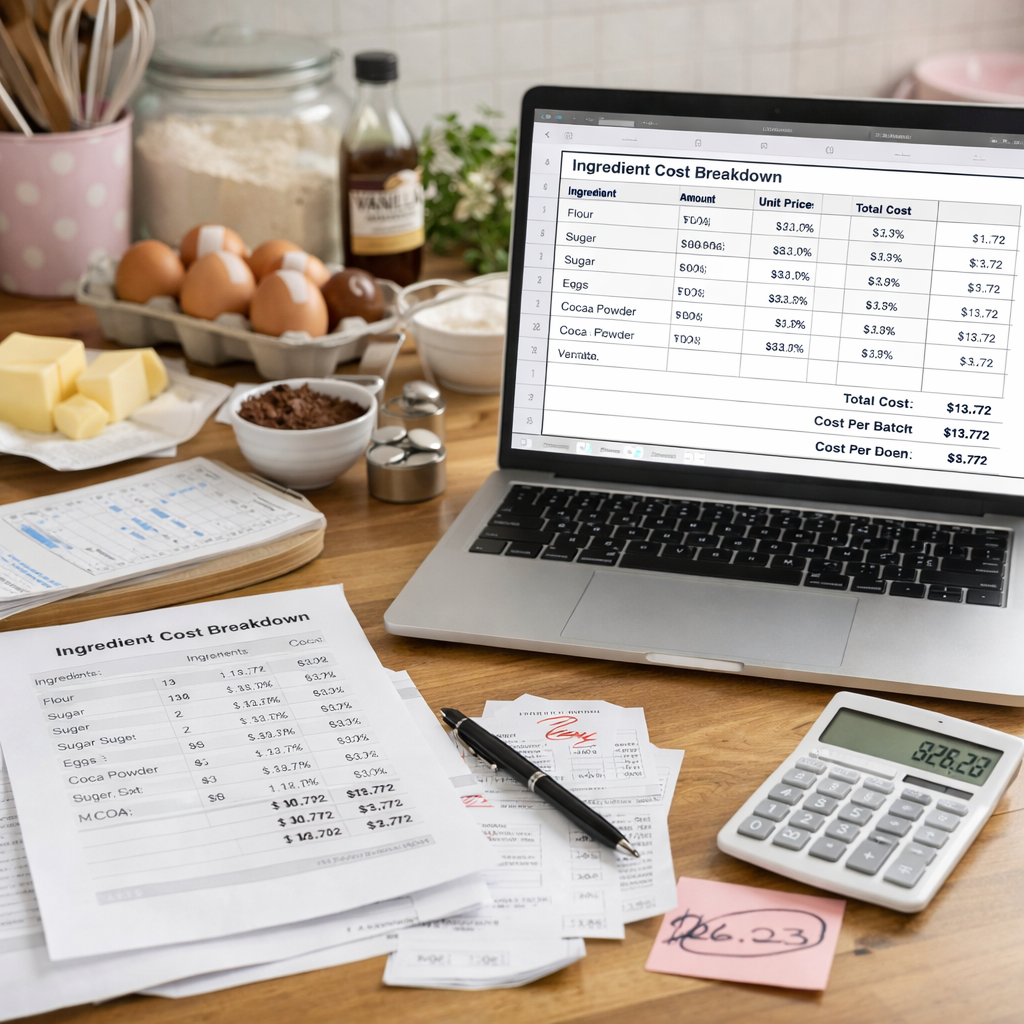
Step 2: Learn to Price Your Baked Goods Correctly
Pricing is the area where most home bakers struggle most — and where getting it wrong hurts the most. There’s a formula that works, and it’s not complicated once you understand it:
Price = Ingredient Cost + Packaging Cost + Labor Cost + Overhead + Profit Margin
Breaking that down:
- Ingredient cost: What did every ingredient in this specific product actually cost? Not a guess — actual per-recipe cost based on what you paid. This requires tracking what you buy and calculating your per-unit ingredient costs.
- Packaging cost: Boxes, stickers, tissue paper, ribbon. These add up and need to be in your price.
- Labor: Your time has value. Calculate how many hours a product takes from prep to delivery, and pay yourself a real hourly rate. Most experienced home bakers charge $15–$25/hour minimum for their labor.
- Overhead: Your share of electricity, gas, oven wear, mixer wear, cleaning supplies. A simple way to start: add 10–15% on top of ingredient and labor costs.
- Profit margin: The money that stays in the business after all costs. You need this to reinvest, cover slow months, and eventually grow.
If you’re doing this math manually in a spreadsheet, it works — but it takes time. Try the SweetTube Academy pricing calculator to run the numbers faster, or consider BatterSuite, which is built specifically for home and cottage food bakers and handles ingredient costing, recipe pricing, and order management in one place.
Step 3: Track Every Ingredient and Supply Purchase
From the day you open your business account, keep records of every purchase related to your baking business. This means:
- Grocery runs for baking ingredients (keep receipts, or use a dedicated card)
- Packaging supplies, boxes, labels, ribbon
- Equipment purchases (mixer attachments, pans, piping bags)
- Website costs, marketing costs, software subscriptions
- Mileage for business-related driving (farmers market, supply runs)
These are all potential tax deductions. A shoebox of receipts works for a while, but you’ll save yourself a lot of stress at tax time if you use even a simple system — a spreadsheet with categories, or a tool like BatterSuite that logs expenses as you go.
Step 4: Understand Your Tax Obligations as a Home Baker
As a self-employed cottage food business owner, your tax situation is different from a W-2 employee. Key things to know:
- Self-employment tax: You owe both the employer and employee portion of Social Security and Medicare taxes (currently 15.3% combined). This comes as a shock to many new business owners. Plan for it.
- Quarterly estimated taxes: If you expect to owe more than $1,000 in taxes for the year, the IRS expects you to pay quarterly estimated taxes (due in April, June, September, and January). Your state likely has similar requirements.
- Business expense deductions: The good news — all those legitimate business expenses you’re tracking reduce your taxable income. Ingredients, packaging, equipment, a portion of your home utility costs, business insurance, software — all potentially deductible.
- Sales tax: Whether you need to collect and remit sales tax on baked goods depends on your state. Many states exempt basic food items but tax “luxury” items. Check your state’s rules.
Consult a tax professional or CPA who works with small businesses for your first year if you’re unsure. The cost is worth it.
Phase 2 Checklist
- ☐ Opened a dedicated business checking account
- ☐ Calculated actual ingredient costs for my core products
- ☐ Set prices using the full cost formula (ingredients + packaging + labor + overhead + profit)
- ☐ Set up a system for tracking income and expenses
- ☐ Understood my quarterly estimated tax obligations
- ☐ Checked my state’s sales tax rules for baked goods
Phase 3: Kitchen and Equipment Setup for a Home Bakery (Days 15–21)

Your home kitchen is your production facility. The more organized and efficient it is, the faster you work, the fewer mistakes you make, and the less burned out you feel after a busy weekend of orders. This phase is about setting up your workspace to support you — not fight you.
Step 1: Designate a Dedicated Baking Zone
If your kitchen can accommodate it, designate a specific area for baking production. This might be a countertop section, a kitchen island, or even a dedicated rolling cart. The goal is to have a workspace that’s:
- Clear of personal clutter when you’re in production mode
- Close to your key equipment (stand mixer, oven, refrigerator)
- Easy to sanitize before and after each baking session
Even if your kitchen is small, having a mental and physical “baking zone” helps you shift into production mode and keeps your business separate from everyday home life.
Step 2: Get Your Food Safety Basics in Place
Regardless of what your state requires for inspections, these food safety practices are non-negotiable when you’re selling food to customers:
- Handwashing: Wash hands thoroughly before every production session and after handling raw eggs, touching your face, or handling anything non-food-related.
- Surface sanitation: Clean and sanitize all prep surfaces before use. Keep a spray bottle of food-safe sanitizer solution at your workstation.
- Ingredient storage: Store all ingredients in sealed containers, off the floor, away from cleaning products. Label everything with purchase dates and “use by” dates.
- Allergen separation: If you work with common allergens (nuts, gluten, dairy), have a system for preventing cross-contact when producing allergen-free items for customers who need them.
- Pet separation: Keep pets out of the kitchen during all production. Most cottage food laws require this, and it’s a basic sanitation requirement regardless.
- Temperature control: Products requiring refrigeration must be kept below 41°F until delivery. Use a refrigerator thermometer to verify.
Step 3: Build Your Equipment Inventory
You don’t need commercial-grade equipment to run a profitable home bakery — but you do need reliable equipment, and you need to know what you have, what it’s worth, and when it needs to be replaced or serviced.
Start by making a complete inventory of all equipment you use for your baking business:
- Stand mixer (brand, model, purchase price, purchase date)
- Oven — your regular home oven counts; note if it runs hot or cold
- Baking pans, cake rings, springform pans
- Decorating tools — turntable, piping bags, tips, bench scraper, smoother
- Packaging supplies and equipment
- Scale (critical for accurate ingredient costing and recipe consistency)
- Thermometers — oven thermometer, instant-read for sugar work
Why does this matter? Your equipment is a business asset. Tracking it properly lets you:
- Claim depreciation on your taxes
- Know when to budget for replacements
- Calculate true overhead costs for your pricing
- Have documentation for insurance purposes
If you’re managing multiple pieces of equipment and want a simple system to track them, IcingVault is designed specifically for home and cottage food bakers to log, track, and manage bakery equipment inventory without needing a spreadsheet or general-purpose inventory app.
Step 4: Set Up Production Systems
As your order volume grows, you need repeatable systems that let you produce consistently without reinventing the wheel every time. Start building these habits now:
- Standardize your recipes: Write down every recipe in a consistent format with exact weights (grams, not cups — scales are more accurate). This is the only way to guarantee consistent results and accurate ingredient costing.
- Create a production schedule template: Map out what needs to happen when for each type of order. Custom cakes often require baking 2 days before, ganache or crumb coat the day before, final decoration the morning of. Build this into your order intake process.
- Build a standard ingredient order list: Know what you need to restock weekly and set a regular shopping schedule. Running out of powdered sugar the day before a big order is a preventable problem.
Phase 3 Checklist
- ☐ Designated a dedicated baking zone in my kitchen
- ☐ Set up food safety basics (sanitation supplies, allergen protocols, pet exclusion)
- ☐ Created a complete equipment inventory with purchase dates and values
- ☐ Standardized my core recipes by weight
- ☐ Created a basic production schedule template for my most common orders
- ☐ Established a regular ingredient restocking routine
Phase 4: Marketing Foundation for Your Home Bakery (Days 22–30)
Marketing doesn’t have to be complicated or expensive when you’re starting out. Most home bakers get their first customers through word of mouth and Instagram — and those two channels can sustain a very healthy order volume if you do them well. This phase is about getting the basics in place so new customers can find you, understand what you do, and easily place an order.
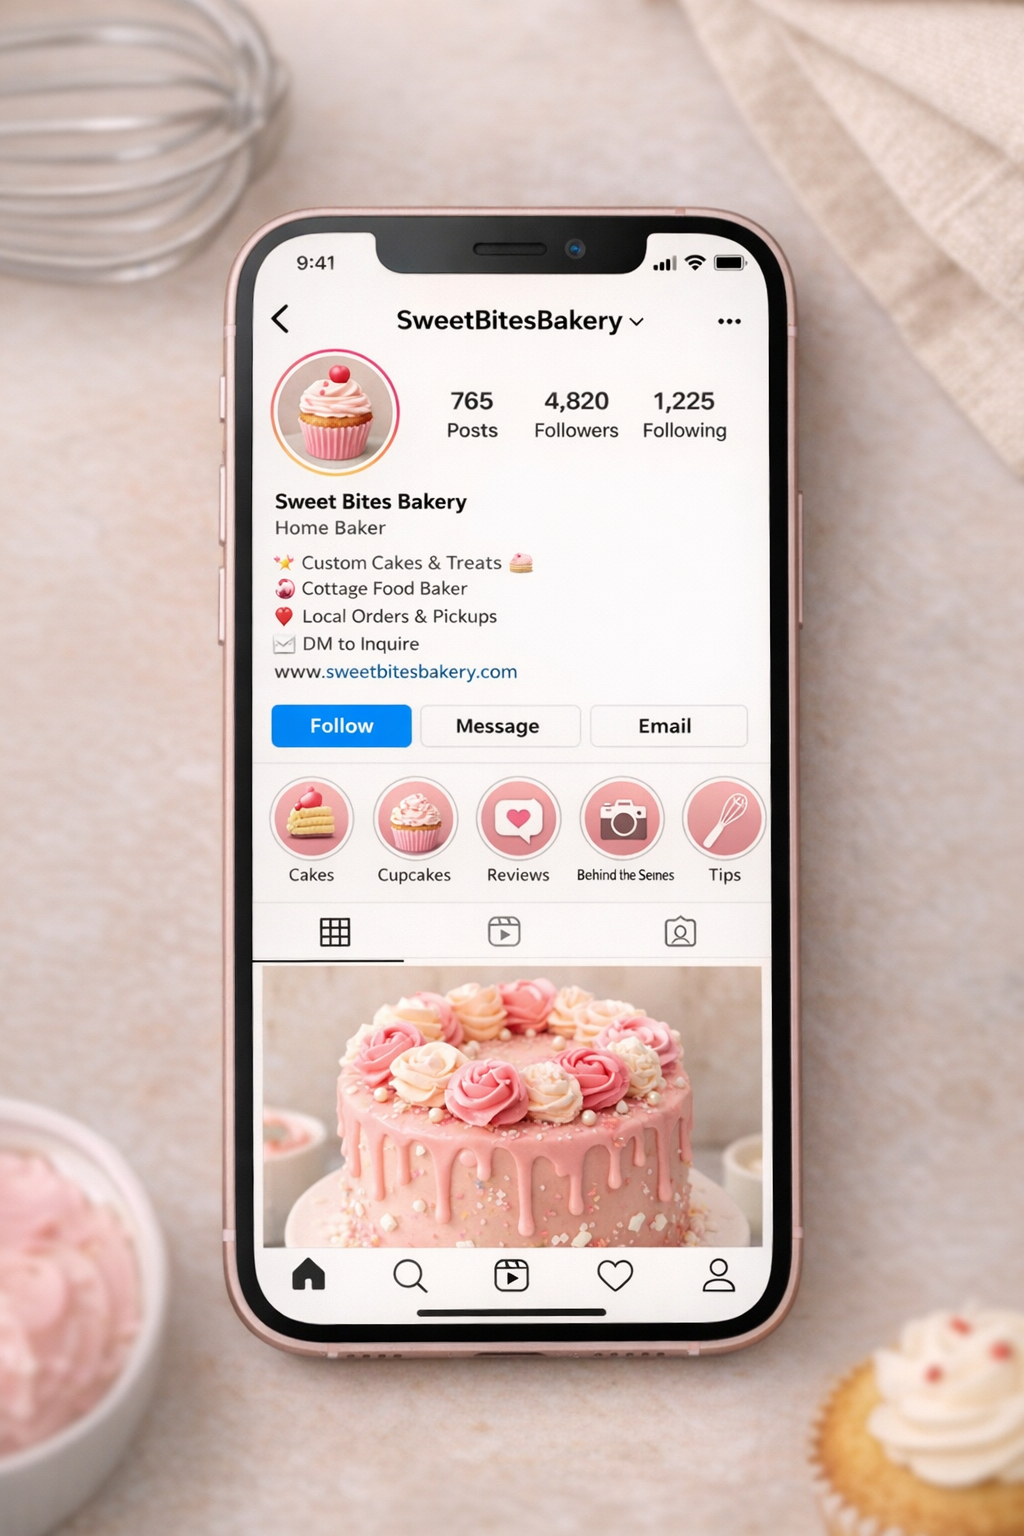
Step 1: Set Up Your Instagram for Business
Instagram is still the most effective platform for most home and cottage food bakers. It’s visual, it’s where your customers spend time, and it allows you to build an audience without paying for advertising — at least in the early stages.
Getting set up right:
- Switch to a Professional (Business) account: This gives you access to insights, the ability to add a contact button, and the option to run ads later.
- Write a clear bio: Tell people exactly what you do, where you’re located (city/area), and how to order. Example: “Custom cakes + baked goods | Beachwood, NJ | DM to order | Link below for order form”
- Add a link to your order form or website: Don’t make customers hunt for how to reach you. Put your order form link or email directly in the bio.
- Post your best work first: Your first 9–12 posts are your portfolio grid. Start with your strongest photos before posting anything else.
For photography: You don’t need a professional camera. Natural light + a clean, simple background (white marble contact paper on a table or cutting board works great) + your phone camera produces professional-looking photos. Consistency matters more than perfection.
Step 2: Create a Simple Product or Custom Cake Page
If you have a website (even a simple one on WordPress, Squarespace, or a free builder), create a dedicated page for your custom cake or signature product offerings. This page should include:
- Your best product photos
- What you offer (flavors, sizes, customization options)
- Your general pricing or a price range (or a link to your pricing calculator/quote request form)
- Your order lead time (how far in advance customers need to order)
- Your service area (local pickup only? Delivery radius?)
- A clear call to action — a link to your order form or contact page
If you don’t have a website yet, a well-organized Instagram profile with a link to a simple Google Form for order requests is enough to get started. Don’t let the absence of a website stop you from taking orders.
Step 3: Set Up an Order Intake System
Before you advertise, make sure you have a clear process for receiving and confirming orders. Nothing damages a new bakery’s reputation faster than communication chaos — missed orders, unclear expectations, last-minute surprises.
At minimum, your order intake process should capture:
- Customer name and contact information
- Product type, size, flavor, and any customization details
- Delivery or pickup date and time
- Delivery address (if applicable)
- Allergen information (does the customer or anyone in their household have known allergies?)
- Deposit amount and payment method
A Google Form that populates a spreadsheet is a perfectly functional starting point. For home bakers who want something purpose-built, BatterSuite includes order management with all of these fields built in, along with automatic cost calculations so you know your margin on every order.
Step 4: Collect and Display Reviews Early
Social proof matters enormously for home bakery marketing — especially when you’re new and potential customers don’t have a long track record to evaluate you on. For every order you complete in your first month:
- Ask the customer for a photo of the product at the event or occasion
- Follow up the day after delivery to ask if they were happy and request a Google review or a Facebook recommendation
- Re-share customer photos on your Instagram (with permission)
Five genuine five-star Google reviews can do more for your business than a hundred Instagram followers. Ask for them early and often.
Step 5: Join the SweetTube Academy Community
Running a home bakery can feel isolating — especially in the early days when you’re figuring everything out. Connecting with other bakers who are in the same stage (or a few steps ahead) accelerates your learning and keeps you motivated.
Join the Sweet Academy community to connect with home and cottage food bakers, get feedback on pricing and marketing questions, and access the growing library of templates, guides, and tools — including everything covered in this post.
Phase 4 Checklist
- ☐ Set up Instagram Business profile with complete bio and order link
- ☐ Posted first 9–12 product photos
- ☐ Created a product or custom cake page on website (or a clear Instagram highlights section)
- ☐ Set up an order intake form with all required fields
- ☐ Established a deposit and payment policy
- ☐ Asked first customers for reviews and social sharing
- ☐ Joined the SweetTube Academy community
You Don’t Have to Figure This Out Alone
Starting a cottage food business is genuinely exciting — but it can also feel overwhelming when you’re staring at all the pieces at once. Legal requirements, pricing formulas, food safety protocols, Instagram strategy — it’s a lot to hold in your head.
Here’s what I want you to take away from this guide: you don’t have to do it all perfectly right away. Work through these four phases in order. Check off the items as you complete them. Build the foundation before you focus on the growth.
And use the tools that are built to help you:
- The Cottage Food Laws Directory to get clear on your state’s specific rules
- The SweetTube pricing calculator to price your products with confidence
- The kitchen setup guide to organize your workspace for efficient production
- BatterSuite for order management, ingredient costing, and business tracking
- IcingVault for equipment inventory tracking
When I look back on my first year as a home baker, I don’t wish I’d baked better. I wish I’d run the business side more intentionally from the start. This guide is your chance to do exactly that.
Now go bake something beautiful.
— Marcia